


Dave is a marketing expert with 15 years experience in the tech and SaaS world. He specializes in educating IT and channel audiences, with a focus on security, privacy, compliance, and marketing technology. With a talent for storytelling and a deep understanding of the industry, Dave transforms complex IT topics into clear, engaging, and impactful narratives.
How to create, add, or remove users from a distribution list in Outlook (Office 365)
TL;DR
A distribution list in Outlook 365 is a single contact address that represents a group of people, allowing you to send one email to multiple recipients simultaneously. This guide covers:
Creating distribution lists (admin center or personal contact groups)
Adding and removing members from existing lists
Managing permissions for who can send to or join the list
Advanced settings like moderation, MailTips, and forwarding rules
To make the most out of Office 365 (Microsoft 365), creating a specific Office 365 distribution list is important.
Managing email distribution lists in Microsoft Outlook is essential for maintaining streamlined communication within teams. Whether you are an IT admin or a regular Outlook user, this guide will help you create and manage a distribution list in Outlook 365.
With so many organizations trusting Exclaimer to manage their Microsoft 365 email signatures, we understand how critical efficient communication tools, such as distribution lists, are. In the sections below, we’ll show you exactly how to build and manage distribution lists in Outlook 365 — step by step.
These steps apply to the Microsoft 365 admin center interface as of April 2025. |
What is a distribution list in Outlook 365?
A distribution list in Outlook is a single contact address that represents a group of people (email recipients). It allows you to send one email that reaches multiple people at once. This is ideal for team updates, project communications, or department-wide announcements.
Creating a distribution list in Outlook 365 helps with time management and improves communication between team members. It also ensures the right people get the right emails.
When you create a distribution list in Outlook for Office 365, you can do the following:
Add or remove member from a list
Mark a list as “unlisted” so it doesn’t appear when searched
Control who can send to the distribution list (all employees can send to this list by default)
Set up moderation rules so messages can be reviewed before being sent to the whole group
Ensure everyone gets the same Office 365 email signature when building a template
What is the difference between a distribution list and a Microsoft 365 Group?
Feature | Distribution List | Microsoft 365 Group | Contact Group (Personal) | Mail-Enabled Security Group |
|---|---|---|---|---|
Primary use | Email-only communication | Collaboration (email, files, Teams, calendar) | Personal email shortcuts | Email + security permissions |
Shared inbox | No | Yes | No | No |
Shared calendar/files | No | Yes | No | No |
Who can create | Admins only | Admins or users (if permitted) | Any user | Admins only |
Visible in GAL | Yes (can be hidden) | Yes | No | Yes (can be hidden) |
Best for | Announcements, newsletters | Team collaboration | Personal contact shortcuts | Access control + email |
What do you need to create a distribution list in Microsoft 365?
Before creating or managing distribution lists, ensure you have the following:
Required admin roles: Global Administrator, Groups Administrator, or Exchange Administrator (for organization-wide lists)
Access to Microsoft 365 admin center: Sign in at admin.microsoft.com
For personal contact groups: No admin access required—any Outlook user can create these
Note: The specific permissions needed vary by task. Creating organization-wide distribution lists requires admin privileges, while personal contact groups can be created by any user.
How do I create a distribution list in Outlook 365?
There are four main ways to create a group of contacts in Outlook. This depends on whether you want a personal contact group or an organization-wide distribution list.
While you’re setting up these lists, remember to review them periodically. As teams evolve in size and composition, you should keep your distribution lists updated.
1. Create an organization-wide distribution list (Microsoft 365 admin center)
This method is for IT admins and creates a shared group accessible across the organization.
Go to the Microsoft 365 admin center and log in.
In the left panel, click Groups > Active groups.
Select Add a group.
Choose Distribution and click Next.
Fill in the group name, description, and email alias.
Assign group owners and members.
Click Create group to finish.
Note: You must have the Groups Administrator role or higher to create organization-wide distribution lists.
If you don't have access to the Microsoft 365 admin center, you can create a distribution list at the personal level. There are three main ways to do this:
2. Create a personal contact group (Outlook desktop app)
Open the Outlook email client and go to the Home tab.
Click New Items in the menu.
Select More Items > Contact Group.
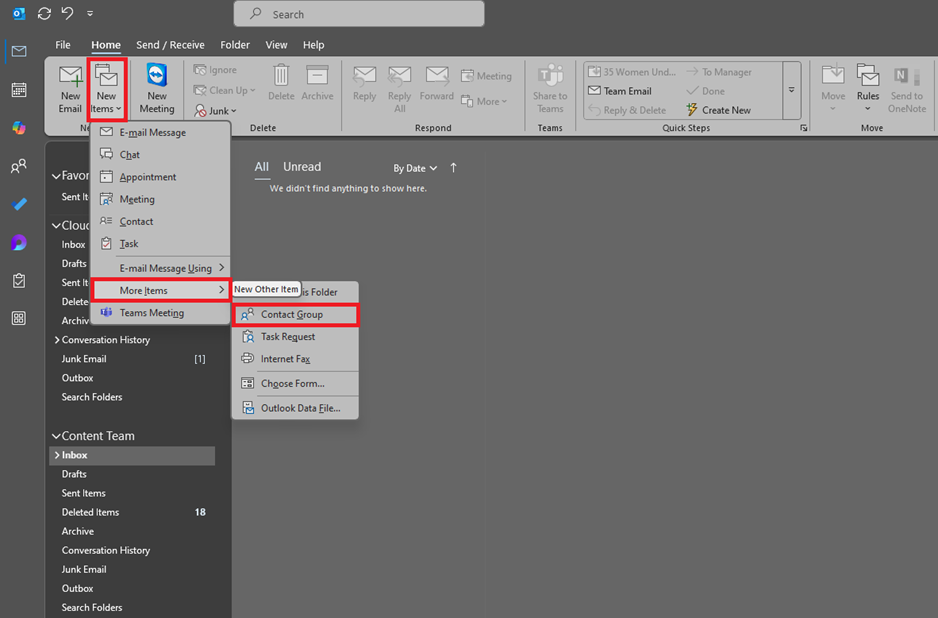
Name your group, e.g., "Marketing Team".
Click Add Members to include contacts from your Outlook or Address Book. Alternatively, add a new email contact directly.
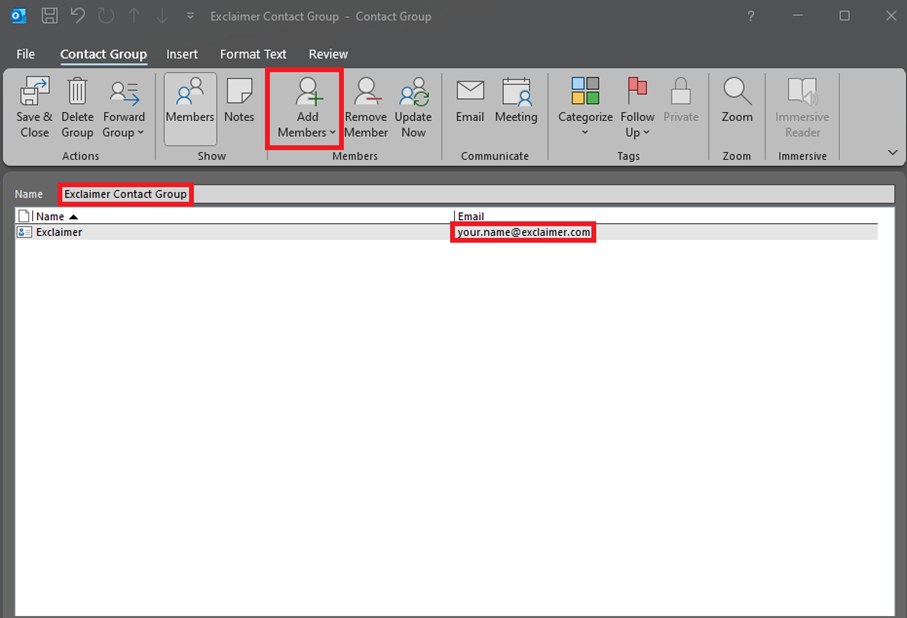
Click Save & Close once you have finished adding your contacts.
Note: This group is saved locally in your Outlook and won't sync with other users or devices.
3. Create a contact group in Outlook for Windows (desktop app)
If you're using the Outlook desktop app on Windows, follow these steps to create a personal contact group (also called a Contact List):
Open Outlook and go to the People icon.
On the Home tab, click New Contact Group.

Enter a name for your group.
Go to Add email addresses. Choose from your Outlook Contacts, Address Book, or manually enter the email addresses.
Click Create when you're done.
Note: This creates a local contact group visible only in your Outlook. It will not sync with Microsoft 365 or be accessible by others in your organization.
4. Create an Outlook 365 distribution list for Mac (new Outlook UI)
If you're using Outlook for Mac, follow these steps to create a personal contact group (also called a Contact List):
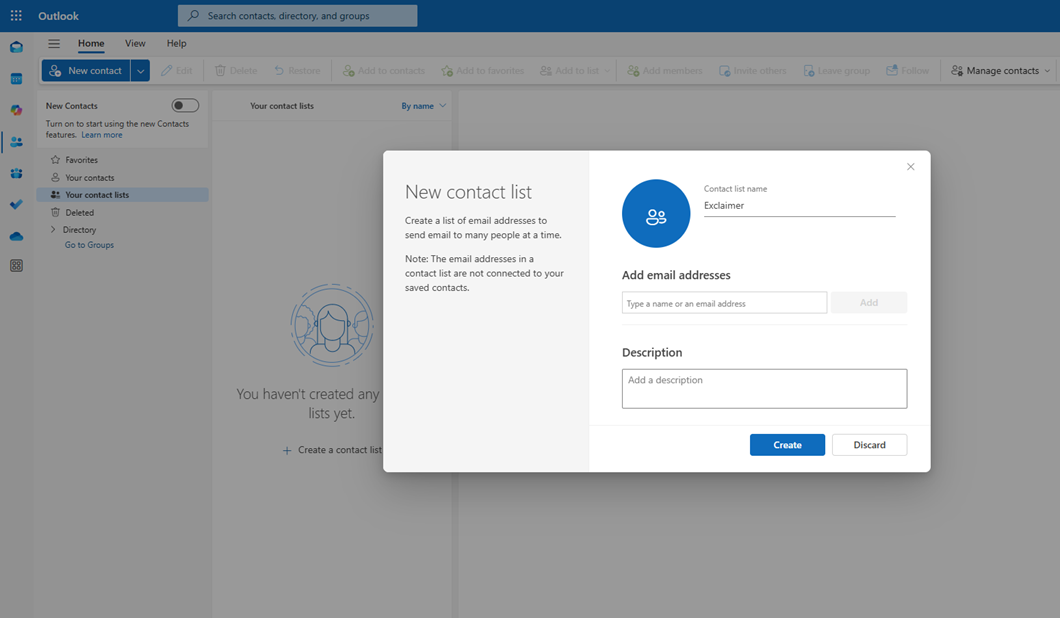
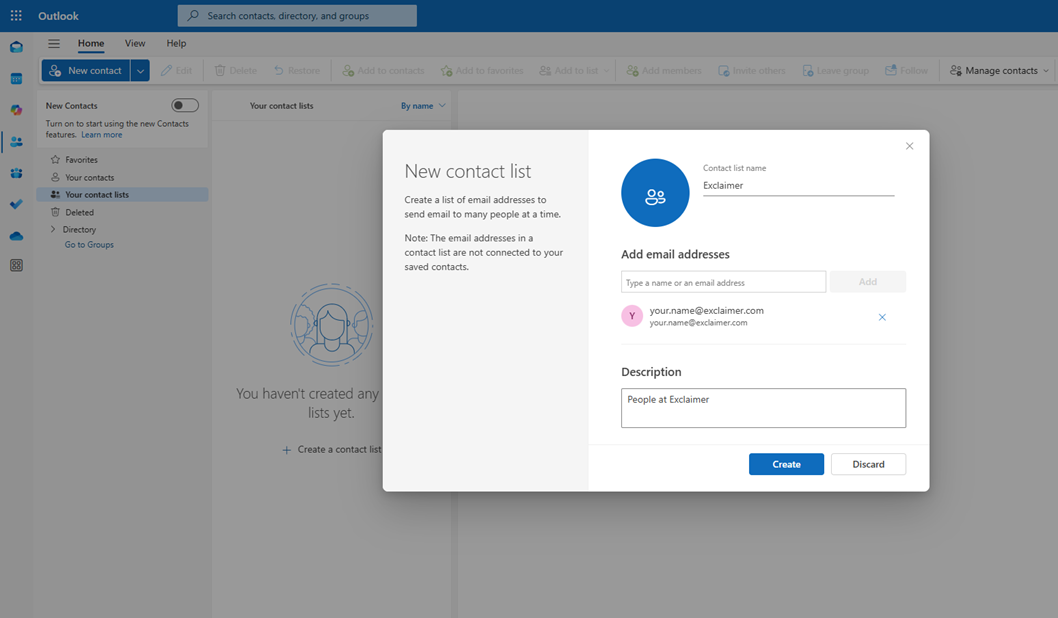
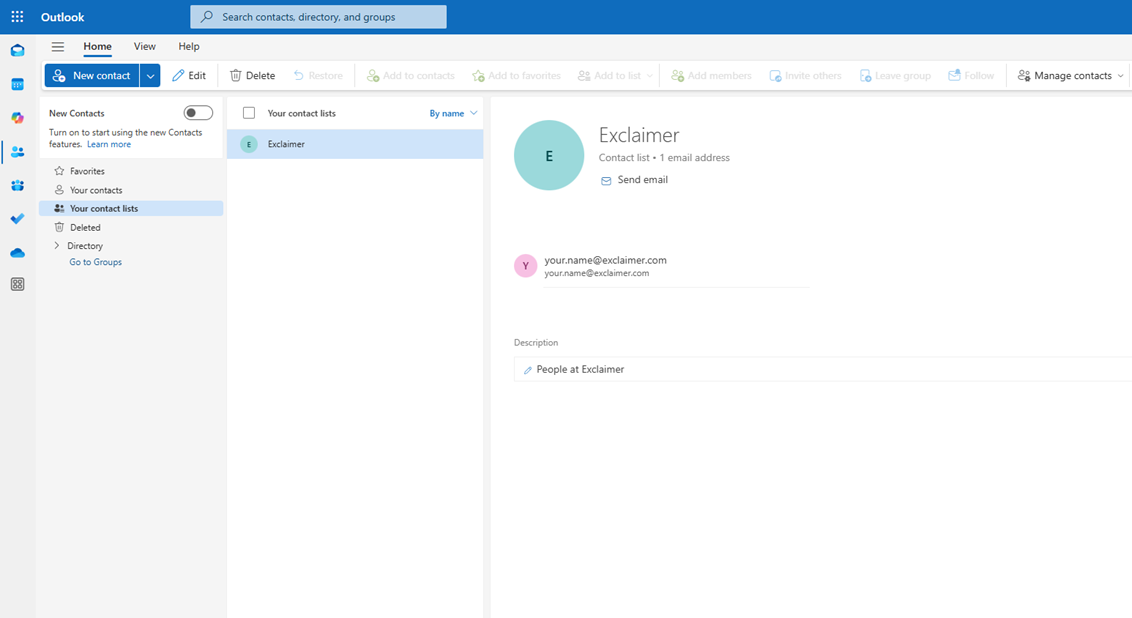
Open the Outlook app and switch to the People view (bottom-left corner).
In the toolbar, click New Contact List.
Enter a name for your list.
Click Add Members, then choose contacts from your address book or manually enter email addresses.
When finished, click Save & Close.
Note: This creates a personal contact list visible only to you. It is not shared across your organization and does not sync with Microsoft 365 Groups or distribution lists.
How do I manage a distribution list in Microsoft 365?
Adding members to a distribution list
Sign in to the Microsoft 365 admin center at admin.microsoft.com.
Navigate to Groups > Active groups.
Click on the distribution list you want to update.
Select the Members tab.
Click View all and manage members or Manage membership (depending on your Microsoft 365 UI).
Select Add members, then search and select the user(s).
Click Save changes.
Note: You must have appropriate permissions—such as the Groups Administrator or Global Administrator role—to manage group membership
Removing members from a distribution list
Sign in to the Microsoft 365 admin center at admin.microsoft.com.
Click Groups > Active groups.
Choose your distribution list.
Go to the Members tab.
Choose either Manage membership or View all members, depending on your current Microsoft 365 Admin interface layout.
Find the user you wish to remove and click the remove option.
Note: You must have the appropriate admin role—such as Groups Administrator or Global Administrator—to manage Outlook distribution list membership.
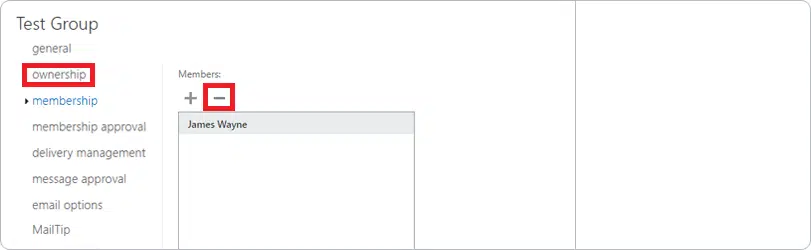
Changing group owners
Group owners can manage membership and approve join requests. To change owners:
Navigate to Groups > Active groups in the Microsoft 365 admin center.
Select the distribution list.
Click the Ownership tab.
Add or remove owners as needed.
Save your changes.
Setting membership approval options
As a distribution group owner or Microsoft 365 admin, you can control how members join a distribution list. You can also manage how they leave the list.
Go to the Microsoft 365 admin center and sign in as a Groups Administrator.
Navigate to Groups > Active groups.
Click on the name of the distribution list you want to edit.
Under Settings, select Membership approval.
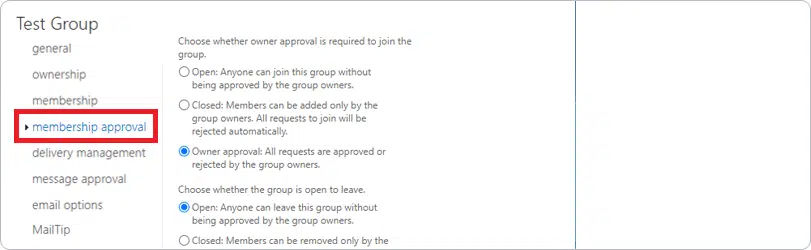
Choose one of the three options available:
Open – Anyone can join and leave the distribution group without admin approval.
Closed – A member can only be added by a group owner. This option automatically rejects requests to join.
Owner approval – Users can request to join; group owners must approve or deny the request.
Click Save once you have chosen your desired option.
Note: These options are available only for mail-enabled security groups and distribution lists in Microsoft 365—not for Microsoft 365 Groups.
Hiding a distribution list from the Global Address List
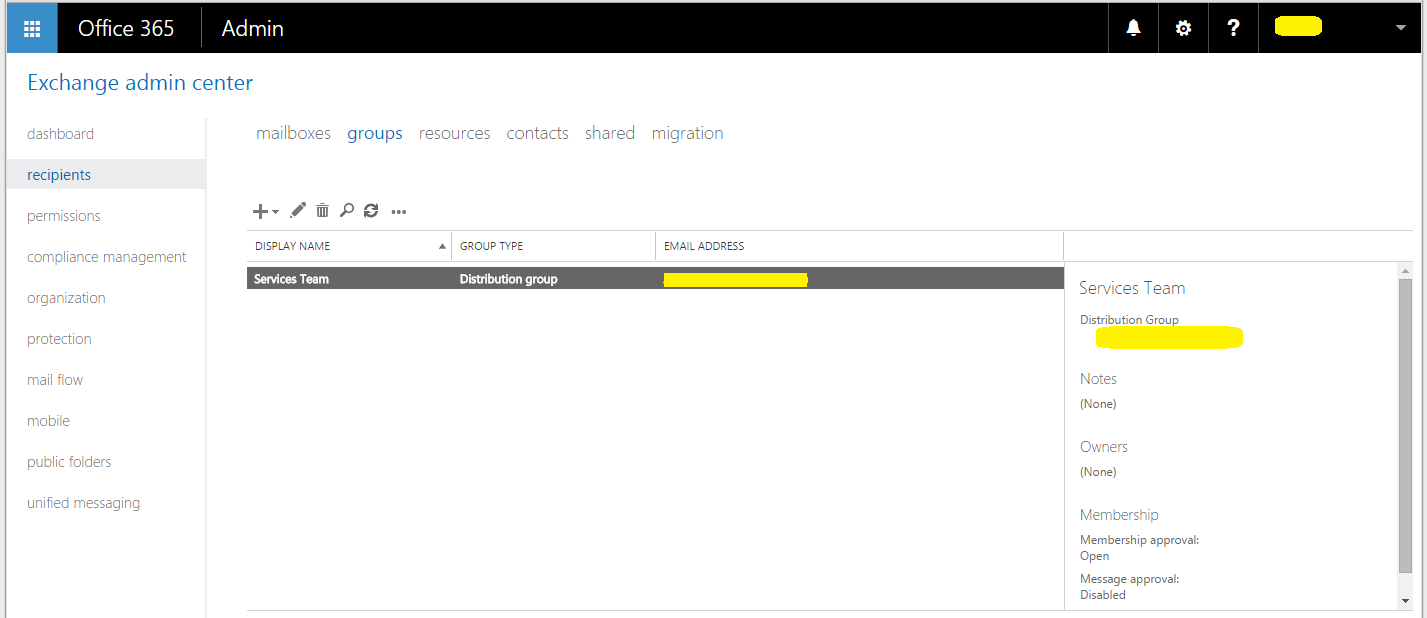
Sometimes it isn't appropriate for everyone to see who's part of an Outlook (Office 365) distribution list. If you don't want a distribution list to show in the Outlook Global Address List (GAL), you can hide it using the Exchange Admin Center.
Go to the Microsoft 365 admin center and sign in as an Exchange Admin.
Navigate to Recipients > Groups, then select the distribution list you want to edit.
Click the Edit (pencil) icon.
Under General settings, check the box for Hide this group from address lists.
Click Save to apply your changes.
Note: Hidden groups will no longer be visible in the Global Address List or autocomplete suggestions in Outlook.
How do I control who can send emails to a distribution list in Outlook?
To prevent unwanted messages or restrict access to certain senders, Microsoft 365 lets admins control who can send emails to a distribution list. This can be managed using the Exchange Admin Center.
Go to the Microsoft 365 admin center and sign in as a Groups Administrator or Exchange Admin.
Navigate to Recipients > Groups, then select the distribution list you want to edit.
Click Edit (pencil icon).
In the left-hand menu, choose Delivery management.
Under delivery settings, you can choose to restrict group emails to internal senders. Alternatively, you can allow both internal and external senders to message the group.
To allow specific people or groups to send to the list, choose the second option. Click the + Add senders button to select names.
Click Save to apply changes.
Note: Only approved senders will be able to message the distribution list. All other senders will receive a non-delivery report (NDR).
How do I add a MailTip to an Outlook distribution list?
MailTips are brief alerts that appear while someone is drafting an email. They help prevent issues—like emailing a large group or sending sensitive content externally—by displaying a warning before the message is sent.
Go to the Microsoft 365 admin center and sign in as an Exchange Admin.
Navigate to Recipients > Groups, then select the distribution list.
Click the Edit (pencil) icon.
Under the General settings tab, locate the MailTip field.
Enter your custom message (e.g., "This group includes external recipients. Do not share confidential info.").
Click Save to apply the MailTip.
Note: MailTips are displayed in Outlook and Outlook on the web when users add the group as a recipient.
How do I set up message moderation for a distribution list in Office 365?
You can manage a distribution list in Microsoft 365. This means that someone needs to approve messages sent to the group before delivery.
Go to the Microsoft 365 admin center and sign in as an Exchange Admin.
Navigate to Recipients > Groups and select the distribution list you want to manage.
Click the Edit (pencil) icon.
In the left-hand menu, click Message approval.
Check the box Messages sent to this group have to be approved by a moderator.
Under Group moderators, click + Add to select one or more moderators. If no moderator is selected, the group owner will be assigned by default.
(Optional) Under Senders who don't require message approval, click + Add to choose internal senders that can bypass moderation.
Click Save to apply your changes
Note: External senders and users not on the bypass list will have their messages held for moderation.
How do I set Send As or Send on Behalf permissions for a distribution list?
If you want users to send emails using the distribution list's address, you can grant Send As or Send on Behalf permissions.
Go to the Microsoft 365 admin center and sign in as an Exchange Admin.
Navigate to Recipients > Groups.
Select the distribution list you want to configure and click the Edit (pencil) icon.
Under Group delegation, choose:
Send As: Recipients will see the message as sent from the group.
Send on Behalf: Recipients will see the message as "Sent on behalf of" the group.
Click + Add and choose the users to grant permission.
Save your changes.
How do I automatically forward emails sent to a distribution list in Microsoft 365?
You can configure Microsoft 365 to forward emails sent to a distribution list to another mailbox or address.
Method: Create a Mail Flow Rule
Go to the Microsoft 365 admin center.
Navigate to Mail flow > Rules.
Click + Add a rule, then choose Create a new rule.
Name the rule (e.g., "Forward DL messages").
Under Apply this rule if..., choose The recipient is > select the distribution list.
Under Do the following..., choose Redirect the message to > select the forwarding mailbox.
Save and enable the rule.
Note: Mail forwarding via rule is ideal for archiving or escalation workflows.
How do I convert a distribution list to a Microsoft 365 Group?
You may want to upgrade your DL to a Microsoft 365 Group for added collaboration features like shared files, calendars, and Teams integration.
Steps (PowerShell only):
Connect to Exchange Online PowerShell.
Run:
Set-DistributionGroup -Identity "GroupName" -UpgradeDistributionGroup $trueVerify the upgrade using:
Get-DistributionGroup "GroupName"
Note: Only eligible Outlook distribution lists (non-nested, no dynamic membership, etc.) can be upgraded.
How do I monitor or audit distribution list activity in Microsoft 365?
Microsoft 365 allows you to track changes and usage of your distribution lists.
Ways to monitor:
Message trace: View who sent emails to the group via security.microsoft.com
Audit logs: Use the Microsoft 365 compliance portal to review changes to group settings, membership, and permissions.
What are best practices for naming and organizing distribution lists in Microsoft 365?
To ensure scalability and consistency, follow these tips:
Use clear naming conventions: Follow a pattern like Dept-Team-Region (e.g., Marketing-EMEA) or prefix with "DL-" for easy identification
Add descriptions to groups: Include the group's purpose, owner, and creation date for clarity
Audit membership regularly: Review distribution lists quarterly to remove inactive users and eliminate duplicate entries
Document ownership: Ensure each list has at least two designated owners for continuity
Set appropriate permissions: Restrict who can send to sensitive lists and enable moderation for large groups
Use tags or prefixes: Apply consistent prefixes like "DL-" or "M365-" for easy filtering in the admin center
Common errors and troubleshooting
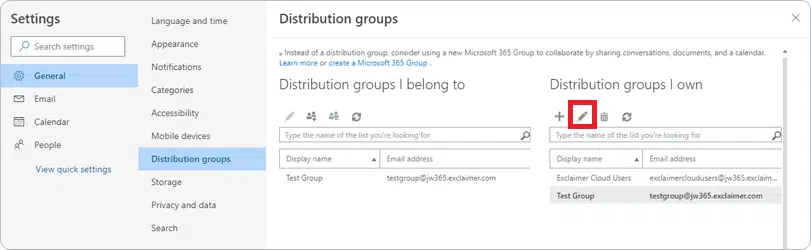
Why can't I add external members to a distribution list? |
External email addresses can only be added to a distribution list if the group's delivery management settings permit external senders. To enable this, navigate to Recipients > Groups in the Exchange Admin Center, select the distribution list, click Edit, go to Delivery management, and ensure external senders are allowed. |
Why isn't my distribution list appearing in the address book? |
The distribution list may be hidden from the Global Address List. To check, go to Recipients > Groups in the Exchange Admin Center, select the list, click Edit, and under General settings, verify that "Hide this group from address lists" is unchecked. |
Why can't I add members to a distribution list? |
You may not have the required admin privileges or ownership of the group. Only users with Groups Administrator, Global Administrator, or Exchange Administrator roles—or designated group owners—can manage membership. Contact your IT admin to request access. |
Why are emails to the distribution list being rejected? |
The distribution list may have sender restrictions enabled. Check the Delivery management settings to see if only specific senders are allowed. Additionally, if moderation is enabled, messages may be held for approval rather than rejected. |
Why don't members receive emails sent to the distribution list? |
Verify that the members are correctly added to the list and that their mailboxes are active. Also check if any mail flow rules or spam filters are redirecting or blocking messages to the group. |
Managing Outlook distribution lists effectively
Managing Outlook distribution lists effectively is crucial to ensuring clear communication and protecting sensitive data across your organization.
Whether you're handling a small internal team or a company-wide group, following best practices will make administration simpler and more secure.
Here are some final tips to keep in mind:
Use meaningful and standardized group names for easy identification.
Add detailed descriptions to each group to clarify its purpose.
Set permissions carefully—decide who can send to, join, or moderate your groups.
Regularly audit and update membership to remove inactive users and maintain relevance.
Monitor delivery issues, bounced emails, and message logs using Microsoft 365 reporting tools.
Upgrade to Microsoft 365 Groups if you need collaboration tools like Teams or shared files.
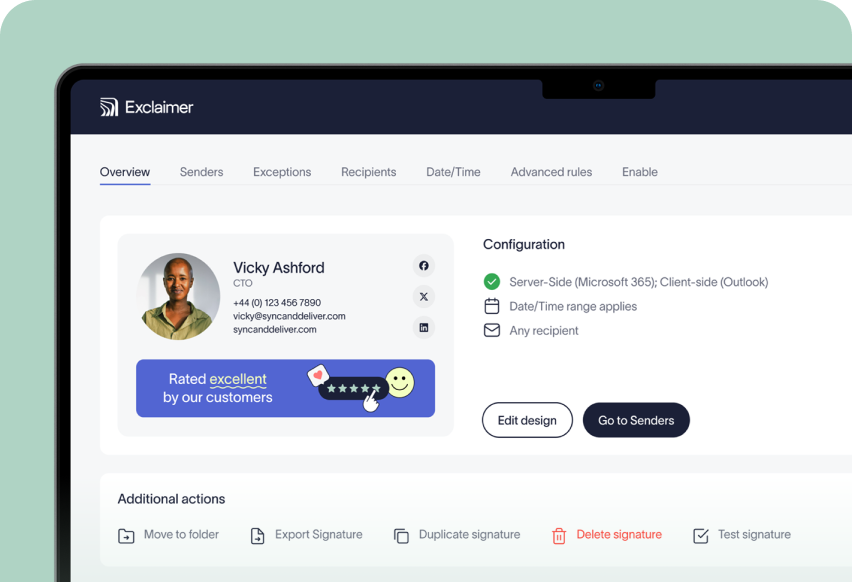
Use Exclaimer’s email signature management platform to apply professional, consistent branding across all group communications.