


How to create and manage email signatures on Mac Mail (step-by-step guide)
28 October 2025
0 min read
TL;DR
- Apple Mail makes it easy to create and manage multiple email signatures directly on your Mac
- Go to Mail › Settings › Signatures to design, format, and assign a professional email signature to your account
- Use HTML for more customization—add logos, hyperlinks, and brand colors for a polished look
- Troubleshoot common issues like missing images or formatting errors by checking HTTPS image links and font settings
- For teams or enterprises, manage every Mac email signature centrally with Exclaimer’s cloud solution to ensure brand consistency and compliance.
If your organization uses Apple devices, it’s important that every employee has a professional, consistent email signature on their Mac. In Apple Mail (also known as Mac Mail), users can easily create and manage multiple email signatures for different accounts. Setting these up correctly ensures your emails always look professional, on-brand, and compliant—no matter which device they’re sent from.
How to add a signature in Mac Mail (12 easy steps)
Follow these simple steps to create and customize your email signature on a Mac using Apple Mail:
Open Apple Mail.
Go to your Mac’s home screen and select the Mail icon to open Apple Mail.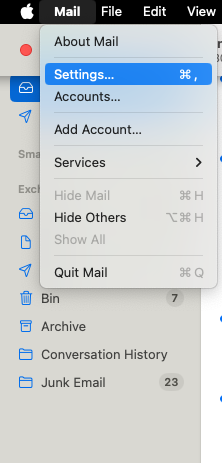
Access your settings.
From the menu bar, click Mail › Settings › Signatures.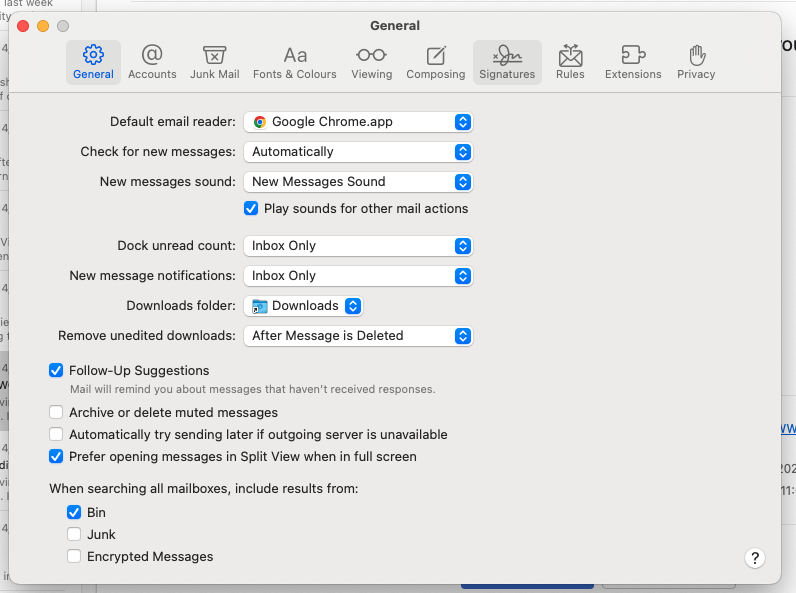
- Choose an account.
In the left-hand column, you’ll see all email accounts connected to Apple Mail. Select the account you want to add a signature to.Tip: If you select “All Signatures,” you’ll need to drag your new signature to a specific account before it can be used.
Add a new signature.
Click the + (Plus) icon to create a new signature.Name your signature.
Enter a recognizable name in the middle column—something clear like “Corporate Email Signature.”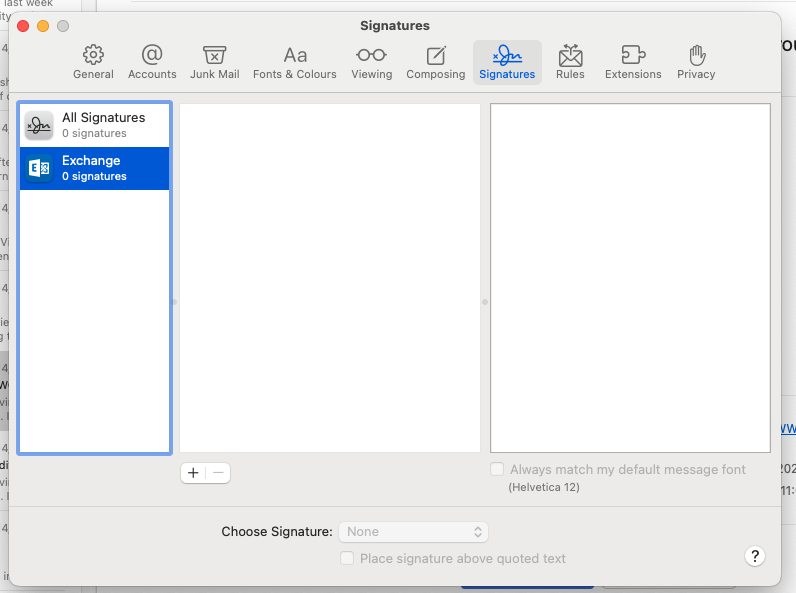
Build your signature design.
In the preview pane, type your contact details and format the layout. This is where you’ll design how the signature will appear in your emails.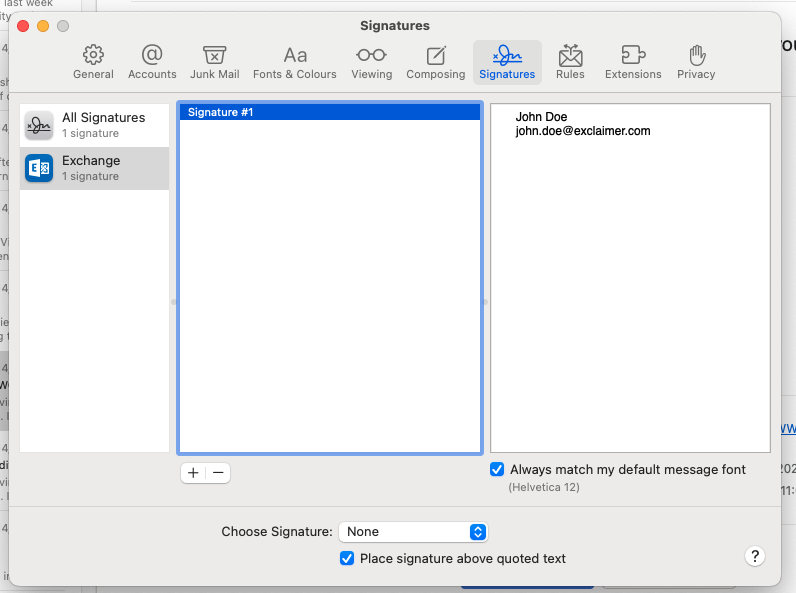
Add your logo or image.
Download your image file (e.g., logo) to your Mac, then drag it into the preview area. Resize if necessary to keep the design balanced.- Format fonts and colors.
Highlight the text you want to edit, then go to Format › Show Fonts to choose a font, or Format › Show Colors to update colors.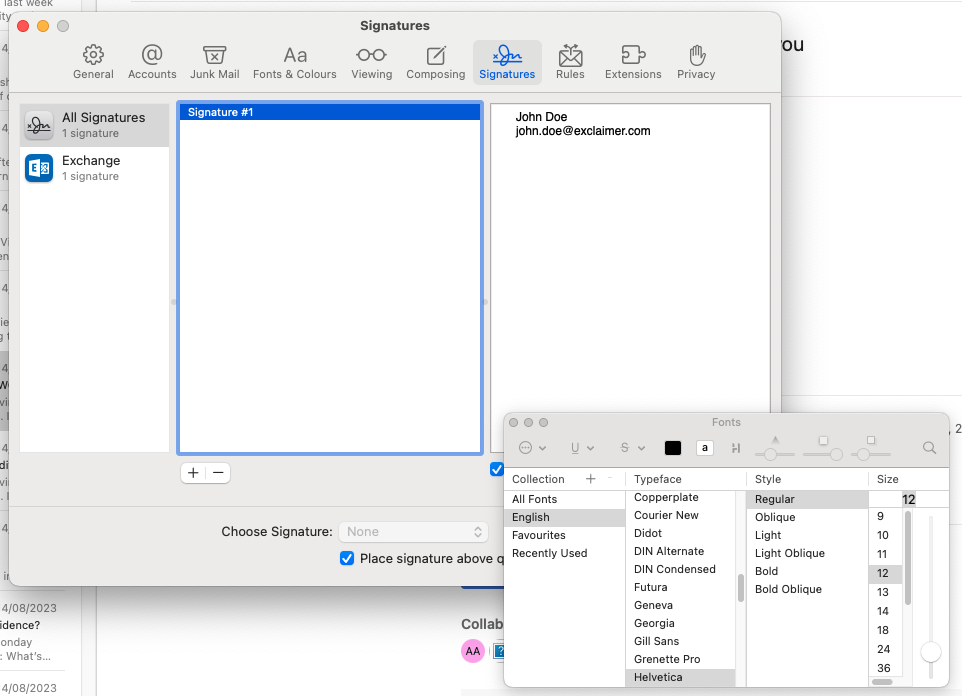
For a professional look, keep font colors simple and align with your brand palette.
Add hyperlinks.
Select the text you want to link, then go to Edit › Add Link to insert a URL (for example, your website or social media page).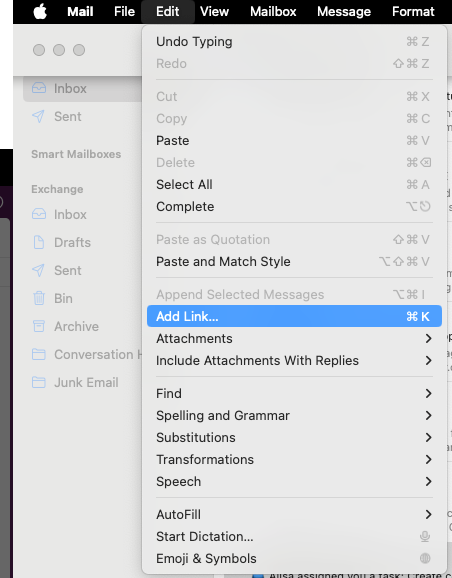
Adjust placement settings.
To make sure your signature appears below the quoted text in replies or forwards, deselect the box labeled “Place signature above quoted text.”Save automatically.
When you close the window, Apple Mail saves your changes automatically.Apply your signature to new emails.
When composing a new message, open the Signature drop-down beside the sender information to select the one you created.
How to create an HTML email signature on your Mac
Creating an HTML email signature on your Mac is a simple and effective way to personalize your correspondence. Here's how you can create a signature on your MacBook:
Open Apple Mail.
Go to Mail › Settings › Signatures.Add a new signature.
Click the + (Plus) button to create a new one.Paste your HTML code.
In the right-hand preview pane, paste the HTML code for your email signature. This can include logos, hyperlinks, or styled text.Save your changes.
Close the window—Apple Mail automatically saves your new HTML signature.
Tip: If your HTML signature includes images or hyperlinks, make sure they use secure HTTPS links and are hosted online. Avoid embedding large files, as this can cause deliverability or display issues.
What not to do in your Mac mail signature
Knowing what to avoid is just as important as knowing how to design your Mac email signature. Poor formatting, oversized graphics, or too many links can make your emails look unprofessional. They can even trigger spam filters.
Here are a few best-practice reminders:
✗ Avoid cluttered designs.
Cramming in too many colors, fonts, or graphics distracts from your message and can look inconsistent with your brand.
✗ Don’t overload with links or images.
Excessive hyperlinks or embedded images increase the chance of your email being flagged as spam. Keep it simple and purposeful.
✗ Skip large attachments.
Uploading logos or banners directly from your desktop can inflate file size. Always use hosted images instead.
✓ Keep it clean and professional.
Include only essential details—your name, title, company, phone number, and website. That’s enough to stay on-brand and make a professional impression.

Tip: Consistency across every employee’s email signature matters more than creativity. Keeping to a single format reinforces brand trust and professionalism.
How to automatically add your email signature in Mac Mail
Once you’ve created your email signature, you can make Apple Mail automatically add it to every outgoing message. Here’s how:
Open Apple Mail.
Go to Mail › Settings › Signatures.Select your account.
In the left-hand column, choose the email account you want to apply your signature to.Choose a default signature.
From the pop-up menu beside Choose Signature, select the signature you want Apple Mail to use automatically.Apply to all new messages or replies.
Decide whether you want your signature added to every new message, or just specific types of emails (e.g., new messages, replies, or forwards).
Note: Creating email signatures for Macs isn’t that difficult for one user. But if you have multiple Mac users, it becomes more difficult to ensure that everyone is using a consistent design.
Troubleshooting common Mac email signature issues
Even when you follow Apple Mail’s steps perfectly, formatting or display issues can still appear. This is often the case when dealing with HTML or cross-platform emails.
Here are some of the most common problems Mac users experience, and how to fix them.
1. Your email signature doesn’t appear in new messages
Make sure the signature is assigned to the correct account under Mail › Settings › Signatures.
Check that a default signature is selected in the Choose Signature drop-down.
If you’re using multiple accounts, confirm that the right signature is attached to the right mailbox.
2. Your logo or images appear as attachments
Always use hosted images (with HTTPS links), not local files from your desktop.
Drag the image directly into the signature preview instead of copying and pasting.
Keep image file sizes small to prevent deliverability or rendering issues.
3. Fonts or formatting look different on other devices
Avoid using fonts that aren’t standard on Windows or mobile devices.
Stick to common fonts like Arial, Verdana, or Helvetica for cross-platform compatibility.
In Apple Mail, uncheck “Always match my default message font” under Mail › Settings › Signatures to retain your custom formatting.
4. Your HTML signature looks broken
Check that your HTML file is properly formatted and that all image and link paths use HTTPS.
If your code includes inline CSS, verify it’s supported by Apple Mail (not all CSS properties are).
Preview the signature in both new and reply messages to confirm consistency.
5. Email signatures differ across users
This often happens when each user creates their own signature manually.
To maintain consistent branding across every Mac, use a centralized email signature management platform such as Exclaimer’s cloud solution.
Tip: Always test your email signature by sending yourself a message before deploying it to the wider team. This helps identify formatting or rendering issues early.
Managing Mac email signatures across your organization
Every employee should use the same Mac email signature template to maintain a consistent brand identity and meet legal or compliance requirements. But when you rely on individuals to manually edit their signatures, problems quickly appear:
Inconsistent branding: Logos, fonts, or colors vary from one user to another.
Outdated information: Employees change roles or phone numbers, and signatures don’t get updated.
IT workload: Teams waste valuable time visiting users’ desks or writing scripts to push updates.
Compliance risk: Legal disclaimers can be omitted or altered, creating unnecessary exposure.
Without centralized control, what starts as a small task becomes a major IT headache. This is especially true in larger or regulated organizations.
Tip: Centrally managing email signatures helps enforce compliance, reduce support tickets, and maintain professional standards across every device.
Using Exclaimer’s email signature management solution for Mac
If you only need one or two Mac users to update their signatures, Apple Mail’s native settings are enough. But as your organization grows, manual updates quickly become inefficient and risky.
With Exclaimer’s email signature management solution, you can control every email signature across your business—from Mac Mail to Outlook and beyond—through one secure, cloud-based platform.
Exclaimer gives IT teams:
Centralized management: Design, deploy, and update every Mac email signature from a single dashboard—no scripts or device visits required.
Automated compliance: Apply legal disclaimers and region-specific information automatically to meet frameworks like GDPR, HIPAA, or ISO standards.
Consistent branding: Ensure every Mac user sends emails with the correct logo, font, and layout.
Audit-ready tracking: Maintain full version history and change logs for accountability and peace of mind.
By using Exclaimer, you eliminate manual errors, reduce support tickets, and guarantee brand consistency across every device and platform.